How to deal with legacy code
Most developers probably prefer to work on greenfield projects than on legacy code.
However reality is different: most of the code we have to deal with in daily projects is legacy, so knowing how to work properly with legacy code is a very important skill.
In this article, I will give some practical guidelines that you can follow each time you need to add a feature or fix a bug in a legacy code base, without leaving technical debt behind you!
The examples are given in C++, but they can easily be translated in other languages like Java or C#.
Why bother with legacy code?
In his essential book « Working effectively with legacy code », Michael Feathers defines legacy code as code without tests. By this definition, a lot of code becomes legacy as soon as it’s written :-).
Code without tests is hard to change without breaking it. Usually, it also implies that this code is hard to test, because it doesn’t have a good design.
Then we enter a vicious circle, also known as the « broken windows theory »: each time someone has to do some change in legacy code, the existing mess doesn’t encourage to take time to code cleanly, so the new code usually just adds more mess on top of the existing one. Then the code starts to « rot », as Robert Martin says, and each new change takes more and more time to do, until a point where nobody wants to maintain the code any more.
The temptation is to give up and redesign the application from scratch, but this is often (not always) a very bad strategy:
- A redesign can take a lot of time (depending on the application complexity of course), and during this time, two systems have to evolve in parallel: the legacy one and the new one
- Clients still use the legacy system as long as the new one is not finished, so the legacy one has to be maintained anyway, which implies a double effort
- A redesign is risky (you never know when it will be finished) and usually costly
- The new version may not be better than the previous one, especially if the redesign is done in a hurry!
- Working on the new system can be frustrating, as it’s not the one really used by the client
Of course in some cases, the legacy mess is just in a so advanced state of decomposition that it’s better to trash it completely, but very often it’s more efficient – and rewarding – to clean it progressively than rewriting everything from scratch.
There are many involved sub-skills to deal properly with legacy code, like:
- Unit testing
- Mocking
- Refactoring
- Clean Code
- Software Design
I will try to give a taste of all that in this article!
Identify what to change
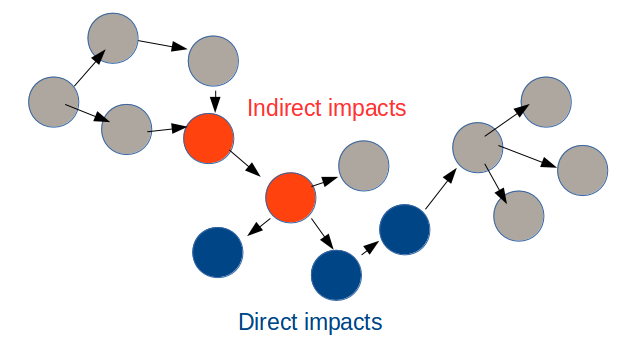
The first thing to do when working on legacy code is to identify which parts of the code are impacted by the feature (or bug fix) to implement.
Impacts on the existing code can be categorized this way:
- Direct impacts correspond to the code responsible for the bug you are trying to fix, or the code you have to extend to implement a new feature
- Indirect impacts are all the changes you have to do only as a consequence of the previous ones, usually unexpectedly, even though they are not directly related to what you wanted to do
An example of indirect impact is when you have to change the structure of a class (let’s say change the signature of a method or rename a field), and it breaks immediately dozens of other classes you didn’t even know about.
If we are able to draw the dependency graph of the components (e.g classes) in the code, the impacts may look like this:
At this point, it’s important to notice that a good design following the High Cohesion and Loose Coupling principles have a strong influence on the number of impacts:
- High Cohesion in the code guarantees that the direct impacts are concentrated around the same location in the code (same method, same class, same module)
- Loose Coupling between components (methods and classes) minimizes the number of indirect impacts
Unfortunately, these good practices are precisely often not followed in legacy code, so you will have to deal with many impacts 😉 .
Put in place a test harness
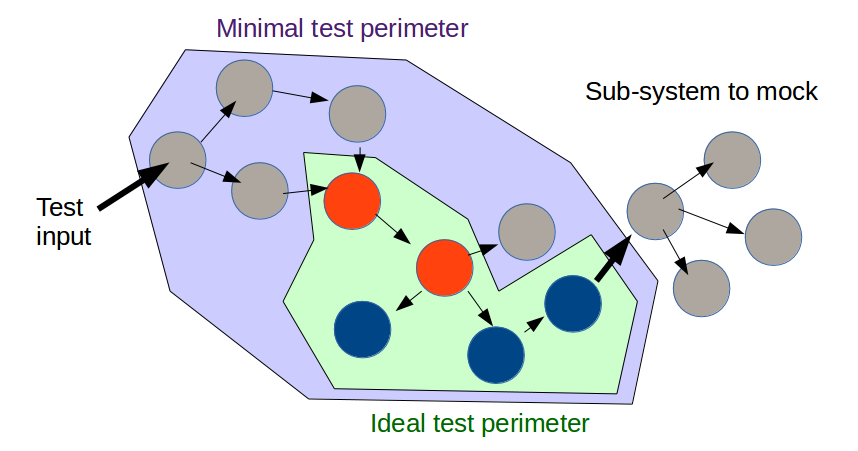
Once the impacts are identified, it’s essential to minimize the risks of breaking existing code by putting in place a « test harness » around it, if you don’t have one already.
By definition, legacy code has no tests and / or is difficult to test, so this won’t be an easy task!
There are two main kind of tests:
- Unit tests, which test individual classes in isolation
- Integration tests, which test several classes together, possibly with dependencies on external systems in the worst case
There are several good reasons to prefer unit tests over integration tests:
- Unit tests run faster than integration tests, so they provide a quicker feedback in case something gets broken
- It is easier to make exhaustive tests with unit tests, and especially to cover error cases
- A good unit test should have a single reason to fail, which makes it easy to find the root cause of the problem when the test is failing. On the other hand, the more components are involved in an integration test, the more difficult it is to track the origin of a failure
- Once unit tests are in place, they serve as a low-level technical documentation for the future readers of the code
However integration tests are needed too, to make sure everything still works together, but ideally the perimeter of the integration tests to put in place should be restricted to the area of the impacted code.
In practice, the minimal test perimeter that can be put in place easily is usually larger than the ideal one, which means the tests will cover more code than required.
It often happens that a part of the system to be tested has dependencies upon a external system, like a database or a web service, which can be slow and / or unreliable. To make the system more easily testable, such external dependencies have to be mocked (or stubbed), which means they have to be replaced by fake components with a deterministic behavior.
The problem is that it’s not always possible to mock external dependencies, because of strong coupling in the code (also known as “spaghetti code”).
For the same reason, it’s often very difficult to write unit tests for legacy code, so writing a test harness before touching the code looks like an impossible mission.
At this point, we get a chicken and egg problem: to change the code safely, we need to write test firsts, but to be able to write tests, we need to change the code!
A solution to this problem is to follow this methodology:
- Find the minimal testable perimeter (integration or end to end test), in the worst case at the user interface level
- If by chance, your application already has a functional non-regression test suite (automated or not), great, that’s already a good start!
- Otherwise, you will have to write this test suite yourself, by sending some inputs to the system and recording the actual outputs. These outputs will become the reference to detect regressions
- Then use safe dependency breaking techniques (explained below) to cut the dependencies to external systems and reduce the test perimeter as most as possible. The idea is to do minimal changes in the code to make it testable, without taking too many risks
- Repeat the whole process again (and again), until you are able to write unit tests around the impacted code
The idea is to start with large scope tests, which are easier to write but not very safe, as a minimal security harness before touching the code.
As you cut dependencies (reduce coupling) in the code, you will be able to write more focused tests, which will give more confidence to make more intrusive changes in the code without risks of breaking existing behavior.
Coverage
How much code coverage (percentage of lines of code covered by tests) is required to work safely on existing code? 80% ? 90% ? 99% ?
Actually, the ideal target should not be to have 100% line coverage (which is the usual metric), but 100% assertion coverage!
Indeed, covering a line of production code by a test (unit or integration test) doesn’t imply that the effect of this line is properly asserted by the test. A 100% line coverage doesn’t give you any guarantee that your tests will catch any bug, if these tests don’t have the needed assertions (i.e. checks that the behavior of the code is the one expected). Assertion coverage is by definition lower than line coverage, so a high line coverage is not a meaningful target by itself, but a low line coverage is not a good sign. In the end, 40% line coverage and assertion coverage is much better than 99% line coverage with 5% asserted coverage.
Refactor to break dependencies
Dependencies and strong coupling
Let’s have a look again at the dependency graph of the legacy code we need to change:
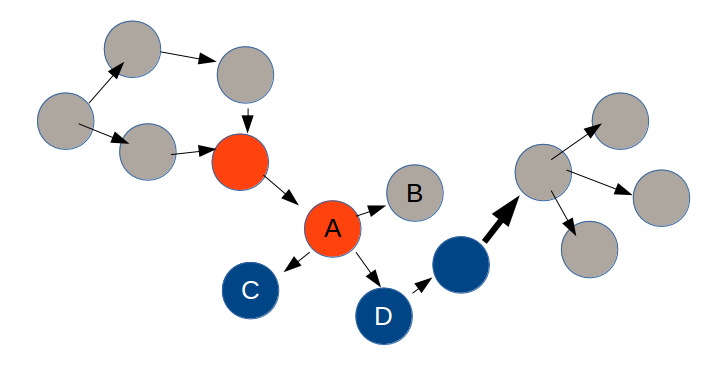
In this graph, each arrow represents a source code dependency. For instance, class A depends on classes B, C and D, which means for instance that any code change in class C will imply another code change in class A (or at the very least, a recompilation).
But there is another kind of dependency, called a runtime dependency, which is related to function calls. If a method in class A calls a method in class B, then we have a runtime dependency from A to B.
In procedural code, source code dependencies and runtime dependencies are identical, as the structure of the code exactly reflects the execution flow.
For instance, let’s suppose we have an Alarm class, whose role is to trigger an alarm when the value returned by a Sensor is outside a given range:
class Sensor {
public:
  float getValue() const;
};

class Alarm {
public:
  void check();
private:
  Sensor _sensor;
};

void Alarm::check() {
  float currentValue = _sensor.getValue();
  if (currentValue < ... or currentValue > ...) {
    // trigger alarm
  }
}
Here, we have a source code dependency from Alarm to Sensor, because the Alarm class directly contains a field of type Sensor. It also has a runtime dependency to Sensor, because:
the constructor of Alarm calls the constructor of Sensor Alarm::check() calls Sensor::getValue() This kind of code is extremely frequent, and makes the Alarm class impossible to unit test properly!
Indeed there is a strong coupling between Alarm and Sensor, and there is no way of testing Alarm alone, without calling getValue on a real instance of Sensor, which may trigger a call to an external system with an unpredictable behavior.
And by the way, maybe testing the Alarm class will ring a real alarm in your building, which is probably not something you will want to do more than once 😉 .
The Dependency Inversion Principle
A solution to this coupling issue is to follow the Dependency Inversion Principle (not to be confused with dependency injection, which is a bit different):
Dependency Inversion Principle
High-level modules should not depend on low-level modules. Both should depend on abstractions.
Abstractions should not depend on details. Details should depend on abstractions.
What does this mean? In the previous example, it means that Alarm should not depend on the concrete Sensor class, but on an interface, let’s say AlarmSensor:
class AlarmSensor {
public:
  virtual ~AlarmSensor() {}
  virtual float getValue() const = 0;
};

class Alarm {
public:
  void check();
private:
  AlarmSensor *_sensor;
};

void Alarm::check() {
  float currentValue = _sensor->getValue();
  if (currentValue < ... or currentValue > ...) {
    // trigger alarm
  }
}

class Sensor: public AlarmSensor {
public:
  float getValue() const override;
};
With this small change in the code, _sensor->getValue() is now a call to a virtual method on an instance of AlarmSensor interface, instead of a hard-wired call to Sensor::getValue().
This means that it’s now possible to write a unit test for Alarm, by writing a custom implementation of AlarmSensor and using it in the test.
By the way, why is this maneuver called dependency « inversion »? Remember that at the beginning, we had procedural code in which the source code dependency was in the same direction as the runtime dependency:
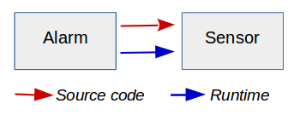
With the introduction of the AlarmSensor interface, the source code dependency from Alarm to Sensor is now reversed, and in the opposite direction from the runtime dependency:
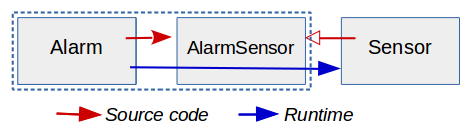
Another benefit of this design change is that the AlarmSensor interface can now specify exactly which methods are required by Alarm (getValue in this example). If the concrete Sensor implementation has other public methods, this is not the business of Alarm, and thanks to the AlarmSensor interface, the implementation details of Sensor remain hidden.
Separate use from construction
Using dependency inversion is not enough to solve the coupling problem.
Alarm now has a pointer field to an AlarmSensor object, but how is this pointer initialized?
To keep the same behavior as before, a real Sensor instance has to be instantiated somewhere, for instance in Alarm constructor:
Alarm::Alarm() {
  _sensor = new Sensor();
}
But if we do this, we still have a source code dependency from Alarm to Sensor, so the problem is only half-solved.
A clean solution is to use dependency injection, which consists in injecting the AlarmSensor object into Alarm constructor (let’s put memory management issues aside for now):
Alarm::Alarm(AlarmSensor& sensor): _sensor(&sensor) {
}
This follows a general design principle which is the separation of use from construction: instead of letting Alarm instantiate itself the Sensor it needs to use, this responsibility is pulled outside Alarm, and the production client code now looks like this:
Sensor sensor;
Alarm alarm(sensor);
alarm.check();
Thanks to dependency injection it is easy to write a unit test, using for instance a stub AlarmSensor:
class StubSensor: public AlarmSensor {
public:
  float getValue() override { return _value; }
  void setValue(float value) { _value = value; }
private:
  float _value = 0;
}

// Unit test code
StubSensor sensor;
Alarm alarm(sensor);
alarm.check(); // Alarm should not be triggered
sensor.setValue(42);
alarm.check(); // Alarm should be triggered
Creating a stub class like this can become quite painful if there are multiple methods in the interface.
Another solution is to use a mocking framework like Google Mock library, which makes the test code easier to write and more elegant:
class MockSensor: public AlarmSensor {
public:
  MOCK_CONST_METHOD0(getValue, float());
};

// Unit test code
MockSensor sensor;
Alarm alarm(sensor);
alarm.check(); // Alarm should not be triggered
ON_CALL(sensor, getValue()).WillByDefault(Return(42));
alarm.check(); // Alarm should be triggered
Maintain backward compatibility
Changing Alarm constructor as described is a quite intrusive change; it implies that all the clients of Alarm now have to change their code to instantiate a Sensor themselves and use the new constructor.
When working on legacy code, we usually don’t want to break everything like that, so it is usually a good idea to maintain source code compatibility with the existing code (in a language like C++ you also have to think about binary compatibility, but that one is not always possible to keep easily).
In our example, it is easy to maintain source compatibility, by keeping a default constructor doing the instantiation of Sensor as before:
class Alarm {
public:
  // Legacy constructor
  Alarm(): _sensor(make_shared<Sensor>()) {}
  // New constructor
  Alarm(shared_ptr<AlarmSensor> sensor): _sensor(sensor) {}
  void check();

private:
  shared_ptr<AlarmSensor> _sensor;
};
(here a shared_ptr has been used instead of a raw pointer to simplify memory management)
Dealing with procedural code
Dependency injection works fine in Object Oriented code, but sometimes you have to deal with procedural code, which makes use of things like:
- Global functions
- Static method calls
- Global variables
- Singletons (which are just global objects in disguise)
Let’s imagine our Alarm::check() method had been written like this:
void Alarm::check() {
  float currentValue = Sensor::GetValue();
  if (currentValue < ... or currentValue > ...) {
    // trigger alarm
  }
}
With this code, it is impossible to play with interfaces and polymorphism to break the dependency, so another solution has to be found.
A simple option is to extract the call to the static method in a dedicated virtual method:
class Alarm {
...
protected:
  virtual float getSensorValue();
};

void Alarm::check() {
  float currentValue = getSensorValue();
  if (currentValue < ... or currentValue > ...) {
    // trigger alarm
  }
}

float Alarm::getSensorValue() {
  return Sensor::GetValue();
}
Then it is possible to override this new method in a unit test by sub-classing Alarm, for instance like this:
class TestableAlarm: public Alarm {
public:
  void setSensorValue(value) { _sensorValue = value; }
protected:
  float getSensorValue() override { return _sensorValue; }
private:
  float _sensorValue;
};

// Unit test code
TestableAlarm alarm;
alarm.check(); // Alarm should not be triggered
alarm.setSensorValue(42);
alarm.check(); // Alarm should be triggered
Again, it is easier to define a mock class using Google Mock instead of writing the testable class by hand:
class TestableAlarm: public Alarm {
public:
  MOCK_METHOD0(getSensorValue, float());
};

// Unit test code
TestableAlarm alarm;
alarm.check(); // Alarm should not be triggered
ON_CALL(alarm, getSensorValue()).WillByDefault(Return(5));
alarm.check(); // Alarm should be triggered
Extract factory method
The method extraction technique is very general, and can be used in many situations.
Let’s imagine that when the alarm is triggered, it creates an AlarmRinger object, and calls it like this:
void Alarm::trigger() {
  AlarmRinger ringer;
  ringer.ring();
};
This will make unit testing painful, as you don’t want to ring any alarm in a test!
The solution is to extract a factory method, to separate the use of ringer from its construction:
class Alarm {
...
protected:
  virtual unique_ptr<AlarmRinger> getRinger();
private:
  void trigger();
};

void Alarm::trigger() {
  auto ringer = getRinger(); // Delegate construction
  ringer->ring();
};

unique_ptr<AlarmRinger> Alarm::getRinger() {
  return make_unique();
};
Now it is possible to override Alarm::getRinger() method in a unit test, to return a custom instance of AlarmRinger. You will also need to extract an interface for AlarmClass if you cannot instantiate a real one in your test (dependency inversion).
Clean the code
Why clean code matters
As soon as your legacy code is covered by a decent suite of tests, you can safely work on it and add new features (or fix bugs) as you need. However, before touching it, you should clean the existing code first.
What does cleaning the code mean? Clean code is code which is easy to read, understand and maintain.
Obviously legacy code is usually not very clean, so your job is not only to write new clean code, but also to clean the legacy one. Here are a few good reasons to do it:
- Understanding legacy code is hard and takes time. By cleaning it, you make it easier to understand for yourself, and for any future developer (may be your future self) who will have to work on the same code
- Features are easier and faster (so, cheaper) to add inside clean code
- You will ease the task of your colleagues who will have to do a code review of your work
- You pay back some of the technical debt of the legacy code, driving away the need for a complete redesign
- Clean code has fewer bugs (you may catch hidden bugs in the process of cleaning the code!)
Try to always apply the « Boy Scout Rule », which is: always leave the code cleaner than you found it.
The most efficient way to clean legacy code is by applying refactoring techniques, which are small transformations of the code that do not change its behavior.
Refactoring can be done more or less safely depending on the situation (and on the language / tools you use), but anyway your code is supposed to be already covered by tests, to minimize the risks.
Readable code
In legacy code, it’s common to find functions with hundreds of lines of code and classes with thousands of lines, which give you the promise of long hours spent in front of your screen, trying to understand what the code does.
To be readable, a function should be small, in the order of magnitude of a few lines of code, so that the reader can understand immediately what the function does. Classes should be small as well; a too big class is usually the sign that it does too many things and that its responsibility is unclear.
It is also essential to use meaningful names for classes, methods and variables, to communicate the intent of the code, and make it easy to read.
When you read legacy code and find something which is not clear (this should happen very often!), don’t hesitate to rename functions and variables (your IDE is your friend) to document your new understanding of the code. It’s much better to clean the code than writing comments, as comments may become obsolete or even misleading.
Eliminate duplication by increasing abstraction
One of the most important goals of refactoring is to eliminate duplication in the code.
Duplication can just be some copy / paste of the same lines in a given method, in which case the solution can often be an extract method refactoring, which consists in isolating the duplicated code in a new method.
Extracting methods is very easy (especially if your IDE can do it automatically) and powerful. However, be careful of not doing it too early: once a method has been extracted, it can be difficult to identify remaining duplication that is spread over multiple methods.
For instance, let’s take this piece of code:
void Order::updatePrice(Item& item) {
  if (_customer.isEligibleForDiscount() && item.quantity > 5000) {
    item.price = item.price * (1 - item.highDiscountRate);
  } else if (_customer.isEligibleForDiscount() && item.quantity > 1000) {
    item.price = item.price * (1 - item.mediumDiscountRate);
  } else if (_customer.isEligibleForDiscount() && item.quantity > 100) {
    item.price = item.price * (1 - item.lowDiscountRate);
  }
}
Here, all the if statements are very similar, but not identical, so we cannot simply apply the Extract Method refactoring.
This is a frequent situation in legacy code, and the secret of refactoring is to find a way to transform similar code into identical code, in other terms to raise the level of abstraction.
This transformation can / should be done progressively, by taking small steps. A possible methodology is to follow what Sandi Metz calls the « Flocking Rules »:
The Flocking Rules
- Rule #1: Find the things that are the most alike
- Rule #2: Select the smallest difference between them
- Rule #3: Make the smallest change that will remove that difference
and apply these rules over and over.
In our example, we would like to make expressions like item.highDiscountRate and item.mediumDiscountRate identical, not just similar.
A simple way to get identical code is to create for instance an array of discount rates inside the Item class, which leads to code like this:
void Order::updatePrice(Item& item) {
  if (_customer.isEligibleForDiscount() && item.quantity > 5000) {
    int discountIndex = 0;
      item.price = item.price * (1 - item.discountRate[discountIndex]);
    } else if (_customer.isEligibleForDiscount() && item.quantity > 1000) {
      int discountIndex = 1;
      item.price = item.price * (1 - item.discountRate[discountIndex]);
    } else if (_customer.isEligibleForDiscount() && item.quantity > 100) {
      int discountIndex = 2;
      item.price = item.price * (1 - item.discountRate[discountIndex]);
   }
}
And that’s it! Now the code which was similar before is now identical, and we have done this transformation without changing any behavior.
Note that at first sight, the code looks even worse than before: it has more lines and contains more duplication! This is something very frequent during refactoring: the level of duplication is increased temporarily, but actually this is just a way to reveal hidden duplication, so that it can be easier to remove it afterwards.
Indeed, now it’s very easy to eliminate duplication by extracting an applyDiscount method, like this:
void Order::updatePrice(Item& item) {
  if (_customer.isEligibleForDiscount() && item.quantity > 5000) {
    applyDiscount(item, 0);
  } else if (_customer.isEligibleForDiscount() && item.quantity > 1000) {
    applyDiscount(item, 1);
  } else if (_customer.isEligibleForDiscount() && item.quantity > 100) {
    applyDiscount(item, 2);
  }
}

void Order::applyDiscount(Item& item, int discountIndex) {
  item.price = item.price * (1 - item.discountRate[discountIndex]);
}
or even:
void Order::updatePrice(Item& item) {
  int quantity = item.quantity;
  if (quantity > 5000) {
    applyDiscount(item, 0);
  } else if (quantity > 1000) {
    applyDiscount(item, 1);
  } else if (quantity > 100) {
    applyDiscount(item, 2);
  }
}

void Order::applyDiscount(Item& item, int discountIndex) {
  if (_customer.isEligibleForDiscount()) {
    item.price = item.price * (1 - item.discountRate[discountIndex]);
  }
}
Beware Feature Envy
The previous refactoring using method extraction is perfectly valid, however it still misses the big picture, which is that the Order class has too much knowledge of the internals of Item, which is something that Martin Fowler calls feature envy.
When you see a class always fiddling with methods (or worse, fields) of another class, it is often a sign that the code is not at the right place.
In the previous example, it’s much cleaner to move all the code into the Item class:
void Order::updatePrice(Item& item) {
  if (_customer.isEligibleForDiscount()) {
    item.applyDiscount();
  }
}

void Item::applyDiscount() {
  if (_quantity > 5000) {
    applyDiscountRate(0);
  } else if (_quantity > 1000) {
    applyDiscountRate(1);
  } else if (_quantity > 100) {
    applyDiscountRate(2);
  }
}

void Item::applyDiscountRate(int discountIndex) {
  _price *= (1 - discountRate[discountIndex]);
}
This is already better, but there is still duplication inside aplyDiscount method, as the if (quantity > x) applyDiscountRate(y) pattern is repeated 3 times.
The duplication can be removed by transforming the series of if’s into a for loop:
const array<int, 3> Item::DISCOUNT_THRESHOLDS = {5000, 1000, 100};
const array<float, 3> Item::DISCOUNT_RATES = {0.7, 0.8, 0.9};

void Item::applyDiscount() {
  for (int i = 0; i < DISCOUNT_THRESHOLDS.size(); i++) {
    if (_quantity > DISCOUNT_THRESHOLDS[i]) {
      applyDiscountRate(i);
      break;
    }
  }
}

void Item::applyDiscountRate(int discountIndex) {
  _price *= (1 - DISCOUNT_RATES[discountIndex]);
}
Here we have a case showing that premature method extraction can sometimes hide duplication. If we inline the applyDiscountRate method:
const array<int, 3> Item::DISCOUNT_THRESHOLDS = {5000, 1000, 100};
const array<float, 3> Item::DISCOUNT_RATES = {0.7, 0.8, 0.9};

void Item::applyDiscount() {
  for (int i = 0; i < DISCOUNT_THRESHOLDS.size(); i++) {
    if (_quantity > DISCOUNT_THRESHOLDS[i]) {
      _price *= (1 - DISCOUNT_RATES[i]);
      break;
    }
  }
}
we can see more easily that there is actually a Discount class hidden within Item. By creating this missing class, we get something like:
const array<Discount, 3> Item::DISCOUNTS = {
  Discount(5000, 0.7),
  Discount(1000, 0.8),
  Discount(100, 0.9}
}

void Item::applyDiscount() {
  for (const auto& discount: DISCOUNTS) {
    if (_quantity > discount.threshold) {
      _price *= (1 - discount.rate);
      break;
    }
  }
}
Are we done with refactoring? The code is quite clean already, but the Item class still needs to access internal fields of Discount, which is not really necessary. If we move some logic into Discount itself, we get a better Object Oriented design:
void Item::applyDiscount() {
  for (const auto& discount: DISCOUNTS) {
    if (discount.isAboveThreshold(_quantity)) {
      discount.applyTo(_price);
      break;
    }
  }
}

bool Discount::isAboveThreshold(int quantity) const {
  return quantity > _threshold;
}

void Discount::applyTo(float& price) const {
  price *= (1 - _rate);
}
When to stop?
At this point, the responsibility of applying the right discount is still left to Item. Moving this responsibility into Discount itself is possible:
void Item::applyDiscount() {
  for (const auto& discount: DISCOUNTS) {
    if (discount.applyIfAboveThreshold(_quantity, _price))
    break;
  }
}

bool Discount::applyIfAboveThreshold(int quantity, float& price) {
  if (isAboveThreshold(quantity)) {
    applyTo(price);
    return true;
  }
  return false;
}
but this doesn’t really simplify the code, so here we have probably gone too far!
Refactoring can be a never-ending process, so at some point a good balance between design principles and readability has to be found.
Kent Beck gave some guidelines to know when to stop refactoring, named the « four rules of simple design ». Refactoring can be stopped when the code:
- Passes its tests
- Minimizes duplication
- Maximizes clarity
- Has fewer elements
References
- « Working Effectively with Legacy Code », Michael C. Feathers
- « Clean Code, a Handbook of Agile Software Craftsmanship », Robert C. Martin
- « Essential Skills for the Agile Developer », Alan Shalloway et al.
- « Growing Object-Oriented Software, Guided by Tests », Steve Freeman and Nat Pryce
- « Refactoring: Improving the Design of Existing Code », Martin Fowler et al.
- « Test-Driven Development, by Example », Kent Beck
- « 99 Bottles of OOP », Sandi Metz and Katrina Owen